The only obvious thing when I started was where the pasture would go, in the old hay field. I also knew where I wanted to put the gate to the pasture, just far enough up the hill to stay dry. Beyond that, I had to work around a large number of natural and man-made obstacles when choosing where to put everything else (see the "before" map below).
The first step for me was siting the barn. Once I decided that the old barn was not worth renovating, the obvious location for the new barn was the old house foundation. This was in close proximity to the driveway and the detached garage, which I now use for hay and equipment storage. Its central location also allowed reasonable access from the house and to the pasture, the detached garage I would use for storage, and the arena. Plus it made use of many cubic feet of concrete that would otherwise need to be demolished at significant cost.
To connect the barn and pasture, I added a path that would prevent mud. The topsoil was stripped and stonedust added on top. The path was continued into the pasture where the gate and water trough are, also to prevent mud. It's priceless! The old wooden bridge, which was a total hazard, was replaced with a drainage culvert over which the stonedust path could continue.
I extended the existing fence line visible at the top edge of the "before" map to enclose the entire pasture, with curved corners where possible. When my horses proved to have a taste for tree bark, I had to fence the trees off with small boxes.
For trailer parking, I widened the end of the existing driveway so I could turn around in front of the garage (see this previous post).
The arena was the biggest earth-moving project by far. It ended up going where the old, decrepit barn had been. The area wasn't great for turnout because the septic field was in one corner (obviously not a corner where the arena went), but it was close to the barn and visible from the house for safety. For an explanation of how I chose the site for the arena, see this previous post.
When the arena builder was here he also excavated a corner for me and built a retaining wall and ramp so that I could push a wheelbarrow right up to the side of my manure dumpster and tip it in. (Before, I was using a small muck bucket and physically lifting the thing five feet in the air to dump it. Not great for a person with back problems...) There was only one logical place to put the dumpster with this setup, where there was already a corner with a steep slope above it. That ended up being maybe a little too close to the barn as far as flies and odors go, but it is convenient for chores, especially in the snow. I have never smelled the manure pit from the house, thank goodness.
Halfway through my first (awful) winter I added a small stonedust dry lot behind the barn that the stalls now open onto. It allowed me to rest my field in early spring to let the mud die down and the grass grow. Now two of my boys (Dominick the Donkey and my 2-year-old) have full-time access via their Dutch doors, which are almost always open to the dry lot. They use it to play, roll, see me coming from the house at dinnertime, etc.
During the winter I also added a CR-6 pad for my pasture Slow Grazer box. The horses liked it so much that they spent all day creating mud around it. The CR-6 helped a lot. Picking manure off it is a terrible chore though, especially when everything is frozen, so I plan to cover it with a layer of stonedust before winter hits this year. I put the pad far enough into the field to give clearance for horses to go around it and each other, but not so far that it was a pain to check/refill or that it would require destroying a patch of really good grass (the stuff by the gate is always a little thin).
As you can see, transforming this property into a functional small horse farm involved a lot of different improvements! However, the result is well worth it and I'm not sure I could have done much better given my constraints. (If you do see something you think could be improved though, please leave me a comment! I'm always on the lookout for good ideas.)
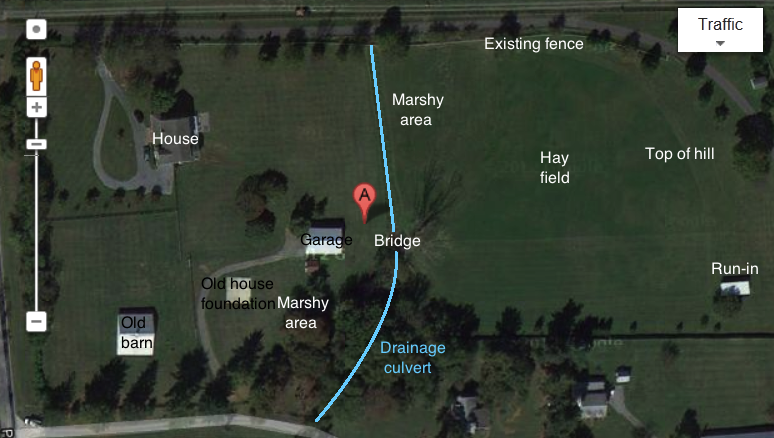 |
| Aerial view BEFORE farm construction, annotated with the property's features. |
As you can see in the "before" map below, the marshy areas and drainage culvert were an obstacle between the obvious barn site (the old house foundation) and the pasture. Therefore I could not connect the pasture directly to the barn via the dry lot, as I would have liked. Placing the barn on the other side of the culvert was not possible without either creating drainage issues by putting it at the bottom of the hill (which slopes up away from the culvert) or placing the barn very far away from the house at the top of the hill. So, the barn would have to be at a distance from the pasture.
To connect the barn and pasture, I added a path that would prevent mud. The topsoil was stripped and stonedust added on top. The path was continued into the pasture where the gate and water trough are, also to prevent mud. It's priceless! The old wooden bridge, which was a total hazard, was replaced with a drainage culvert over which the stonedust path could continue.
I extended the existing fence line visible at the top edge of the "before" map to enclose the entire pasture, with curved corners where possible. When my horses proved to have a taste for tree bark, I had to fence the trees off with small boxes.
For trailer parking, I widened the end of the existing driveway so I could turn around in front of the garage (see this previous post).
The arena was the biggest earth-moving project by far. It ended up going where the old, decrepit barn had been. The area wasn't great for turnout because the septic field was in one corner (obviously not a corner where the arena went), but it was close to the barn and visible from the house for safety. For an explanation of how I chose the site for the arena, see this previous post.
When the arena builder was here he also excavated a corner for me and built a retaining wall and ramp so that I could push a wheelbarrow right up to the side of my manure dumpster and tip it in. (Before, I was using a small muck bucket and physically lifting the thing five feet in the air to dump it. Not great for a person with back problems...) There was only one logical place to put the dumpster with this setup, where there was already a corner with a steep slope above it. That ended up being maybe a little too close to the barn as far as flies and odors go, but it is convenient for chores, especially in the snow. I have never smelled the manure pit from the house, thank goodness.
Halfway through my first (awful) winter I added a small stonedust dry lot behind the barn that the stalls now open onto. It allowed me to rest my field in early spring to let the mud die down and the grass grow. Now two of my boys (Dominick the Donkey and my 2-year-old) have full-time access via their Dutch doors, which are almost always open to the dry lot. They use it to play, roll, see me coming from the house at dinnertime, etc.
During the winter I also added a CR-6 pad for my pasture Slow Grazer box. The horses liked it so much that they spent all day creating mud around it. The CR-6 helped a lot. Picking manure off it is a terrible chore though, especially when everything is frozen, so I plan to cover it with a layer of stonedust before winter hits this year. I put the pad far enough into the field to give clearance for horses to go around it and each other, but not so far that it was a pain to check/refill or that it would require destroying a patch of really good grass (the stuff by the gate is always a little thin).
As you can see, transforming this property into a functional small horse farm involved a lot of different improvements! However, the result is well worth it and I'm not sure I could have done much better given my constraints. (If you do see something you think could be improved though, please leave me a comment! I'm always on the lookout for good ideas.)
 |
| Aerial view AFTER farm construction, annotated. |
No comments:
Post a Comment